In today’s fast-paced and dynamic digital landscape, efficiently managing cloud infrastructure has become crucial for organizations seeking scalability, agility, and cost-effectiveness. That’s where Terraform comes into play. Terraform, developed by HashiCorp, is an open-source infrastructure-as-code tool that enables you to define, provision, and manage cloud resources using a declarative configuration language. By adopting Terraform, you can embrace the power of infrastructure automation, version control, and collaboration, revolutionizing the way you build and maintain your infrastructure.
In this comprehensive guide, we will take you on a journey to discover the Fundamentals of Terraform Certification and equip you with the knowledge and skills needed to kickstart your infrastructure automation journey. Whether you’re a seasoned DevOps professional, a cloud architect, or a system administrator, this guide will provide you with a solid foundation for leveraging Terraform to streamline your infrastructure management processes.
From understanding the key concepts of Harshicorp Terraform Certification to deploying your first infrastructure resources, this guide will cover everything you need to get started with Terraform. By the end, you’ll have the confidence to embark on your own Terraform projects and harness the full potential of this powerful tool.
Step 1: Installing Terraform
To begin, you’ll need to install Terraform on your local machine. Terraform supports multiple operating systems, including Windows, macOS, and Linux. Follow these steps:
- Visit the official Terraform website at https://www.terraform.io.
- Navigate to the “Downloads” section and choose the appropriate package for your operating system.
- Download the latest stable release and follow the installation instructions for your specific platform.
Once installed, you can verify the installation by running Terraform version in your command-line interface. If Terraform is correctly installed, it will display the installed version number.
Boost your earning potential with Devops expertise. Explore our certified Devops courses for a high-paying career
- Explore azure devops certification
Step 2: Setting Up Your Terraform Project
With Terraform installed, you’re ready to create your first Terraform project. Follow these steps:
- Create a new directory for your project.

- Create a new file with the extension .tf (e.g., main.tf). This file will contain your Terraform configurations.

- Open the main.tf file using a text editor of your choice.


Step 3: Writing Your First Terraform Configuration
In the main.tf file, you’ll define the infrastructure resources you want to provision. Let’s start with a simple example of creating an AWS EC2 instance:
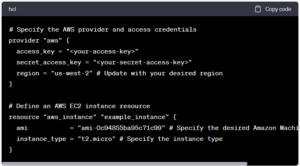
Replace <your-access-key> and <your-secret-access-key> with your AWS access key and secret access key, respectively. Ensure that you have valid AWS credentials with the necessary permissions to create EC2 instances.
Step 4: Initializing and Applying Terraform Configuration
Before you can provision resources using Terraform, you need to initialize the project and download the necessary provider plugins. Follow these steps:
- In your project directory, run the following command: This command initializes the project and downloads the required provider plugins. It only needs to be run once for each new project or when you introduce new provider dependencies.

- After the initialization is complete, apply the Terraform configuration: Terraform will read the configuration from the main.tf file, create an execution plan and prompt you to confirm the changes it intends to make. Type yes to proceed with the resource creation. Once confirmed, Terraform will provision the AWS EC2 instance according to the specified configuration.


Step 5: Managing Your Infrastructure
With Terraform, managing your infrastructure is easy. You can modify, update, or destroy resources using the same configuration file. Here are a few helpful commands:
- terraform plan: Generates an execution plan, displaying the changes that will be made to your infrastructure without actually applying them.
- terraform apply: Applies the changes defined in your Terraform configuration, creating, modifying, or deleting resources as needed.
- terraform destroy: Destroys all resources created by your Terraform configuration, effectively tearing down your infrastructure.
Conclusion
Congratulations! You’ve taken the first steps in getting started with Terraform. By following this guide, you’ve installed Terraform, created your first Terraform project, and provisioned an AWS EC2 instance. You can now explore more advanced features, experiment with different cloud providers, and scale your infrastructure using Terraform’s declarative approach.
Remember to always adhere to best practices, such as using version control for your Terraform code and managing sensitive credentials securely. As you become more proficient with Terraform, you’ll unlock its true potential for infrastructure automation and management.
Enjoy your journey with Terraform, and stay tuned for more exciting adventures in the world of cloud infrastructure management!
Explore our free video content to learn easily on YouTube.